Tuesday, June 30, 2015

Fabric & Thread Lace Scarf

I've been spending some relaxing time just stitching lately.  I've been stitching thread lace scarves. Here are a few pictures of some of the scarves I've stitched.  They are an easy 2 hours of stitching.  Most recently I've spent a couple of hours happily stitching while watching episodes of NCIS....

The first one is strictly thread couched over heavy thread.

The second one is Fabric and thread.


This third one is a fabric and thread lace scarf that I've just finished stitching.  I just need to rinse out the water soluble stabilizer.


I'll be teaching both these scarves as classes at the WonderFil Threaducation Centre in August.

Saturday, June 27, 2015

Handi Quilter Academy 2015

I didn't register this year for the Handi Quilter Academy in Salt Lake City....but I did get to go.  I went with WonderFil Specialty Threads and had such fun!  

Our booth under construction
The only downside of the trip was that I stepped off a speed bump (don't ask) and turned my ankle as I was leaving Calgary.  I then "dragged" my suitcase through two airports and a hotel with a very sore ankle.  I was quite worried about how I was going to function during the week.  My suitcase was filled with all our display quilts and was quite heavy.  It wasn't until I was setting up the booth that I realized why it hurt so much to walk and "drag" my suitcase along!  Guess I need to get a new suitcase before my next trip.
One of these wheels is not like the other!
I had some great times chatting with quilters from all over North America as well as putting some faces to names that I see in the groups I am in on Facebook. We talked about where we're from, what machine(s) we have and what classes we were registered for..and I helped to educated them about WonderFil threads.

One day at lunch every registrant received a lovely box of thread from WonderFil.  Andrew had an opportunity to share a little bit about the spools of thread in their boxes.
Aren't these the cutest boxes?
  
I slipped into a ProStitcher class the first afternoon and in 10 minutes got my biggest stumbling block cleared up!  I've already practiced and feeling so much more confident.  I learned that you have to do something 21 times before it becomes a habit...I have a lot of sewing to do!

I was able to slip into more classes during the week and sit at the back and observe and learn!  
Applique and Couching on a longarm.
Got hugs with a few old and newer friends
Debby Brown showing off her new thread FabuLux
We went on a tour of the new Handi Quilter headquarters and were allowed to walk around the offices and go into any office and look at the quilts on the walls. I saw a lot of inspirational quilts.  My favourite was the Lone Star that hung just at the front door.


The flights home were wonderful.  I had plenty of room and got a short nap on both flights.  I couldn't resist taking pictures of flying above and through the clouds!


Tuesday, May 26, 2015

Sunny Lanes quilt

Sunny Lanes Quilt from Quilter's Cache is my Mum's most favourite quilt pattern.  She has buckets and tubs of fabrics that she keeps cutting into 2" squares and sewing together.  She has done a number of these quilts and just swaps out the background (large beige) and focus fabrics for a different look.  I'm the lucky one who gets to quilt them for her.


I had made some scrappy nine-patch quilts for some little guys in our church last year.  I still had lots of these 3" cut squares left over, so I enlarged the blocks and sewed half square triangles instead of connector corners and made my own version.  This quilt went together much faster (because it used bigger blocks).


I added a simple single border to use up some of the remaining fabric and to give the quilt a visual finish.  I find adding borders to many quilts acts as a frame and helps to keep the quilt flatter and protect all those seams from opening.


I'll often take a few minutes and lay out some scraps of fabric to "audition" quilting designs that I want to use.  I can then trim these pieces up and they are great to use as samples in classes.


I stitched a simple swirl in the 4 x 4 patch blocks and then stitched Heavy Metal Quilt Design in the red and blue Half Square Triangle Units.


I needed to use my Clover White Marking Pen to sketch the direction of the swirls....I did make a few mistakes, but oh, well.  The Clover White Marking Pen is one of my favourite tools.  The marks remove easily with heat.  So a quick press, or time spent in the dryer removes all the markings.  I have yet to see them come back.

I quilted the border of this quilt with a ribbon swirl.  I am finding that I like to repeat the same element throughout a quilt.  I had an all over swirl in the 4 x 4 blocks, Heavy Metal Swirls in the red and blue blocks and the Ribbon Swirl in the border.  All are versions of the swirl shape.


I'm partial to solid quilt backs.  Often a new and interesting pattern is seen on the back of the quilt.  In this case, I didn't have enough backing fabric, so I stitched together some remaining 3" cut units and added some blue strips to the end.  


I used to be quite particular about binding.  I considered myself a "purist" and would only hand stitch the binding to the back of the quilt.  I have become a more "practical" quilter.  I want to get the quilts done!!!!!  So, now I'm machine stitching the binding to the back of the quilt, folding it to the front and machine stitching it to the front of the quilt!  


Lately, in my mind, DONE is more important then PERFECT!


Monday, May 11, 2015

Classes at WonderFil Threaducation Centre and Handi Quilter Studio

Here is the latest list of classes I'm teaching in the next few months at the Handi Quilter Studio.  For more information or to register:  call 403-250-8262 or 403-819-8126. 

Free Motion Quilting - Basics. Thursday, June 11; 6:30-9:30pm. $40
fmq sample 1
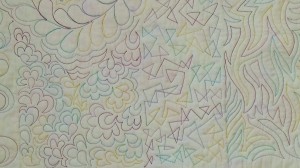
This class is for those who haven't tried Free Motion Quilting before, or want a refresher.  In this class, students will learn how to set up their machine for Free Motion Quilting and how to get their quilt layers ready for quilting. Students will learn 5 basic shapes that make up all Free Motion Quilting designs and have lots of opportunity to practice stitching.

Free Motion Quilting - Next Steps.  Thursday, June 25; 6:30-9:30pm. $40
tutti purple snap bagIf you know the basics, we'll take the time to learn how to combine these stitch patterns into some creative quilting designs.  We'll look at some quilt samples and make some suggestions for creative custom quilting.

Free Motion Quilting - Tear Drop Feathers. Thursday, July 9; 6:30-9:30pm $40.
FMQ Feathers - horizontal
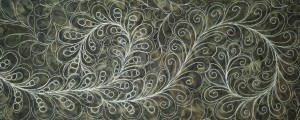
This is the simplest method of stitching feathers. Learn how to stitch tear drop feathers using spine variations.  Students will learn how to stitch borders and circles and create an all over fill design.

Thread Lace Scarf (Domestic machines).  Thursday, August 6; 1-4pm. $60 supplies included.
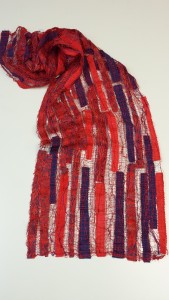
Stitch a beautiful lace scarf using only your sewing machine and thread!

Fabric and Thread Lace Scarf (Longarm and MidArm machines). Thursday, August 20, 1-4pm. $70 supplies included.
FABRIC & THREAD LACE SCARF
Use a longarm or mid arm quilting machine to stitch together scraps of fabric and thread into a lovely wardrobe accessory.

Kids Quilt Camp. Monday-Friday July 13-17 or August 10-14; $195 (fabric kits optional $65)
IMG_0002
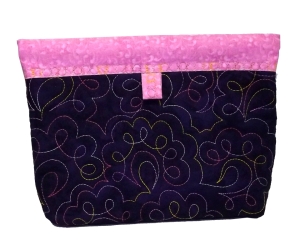
This is a great class for our younger sewers (grade 2 and older).  Quilters will cut and sew strips of fabric into the quilt top.  They will quilt on the longarm machines and machine stitch the binding.  They will also stitch a messenger bag.

Monday, April 27, 2015

Winter Ice Quilt

Last year I challenged myself to finish projects.....I am still working on that list.

I am pleased to say I've quilted Winter Ice, but not entirely happy with the end results but its another project that just needs finishing.


This quilt started as a scrappy swap that I ran at Needleworks in 2008.  The participants brought a listed amount of FQ or specific sizes of fabrics in the required colours.  In this case I think it was 11" strips or FQ of blues (darker) and whites.  We cut the fabrics into sections and shared them around.  I wanted a bigger quilt than a lap size, so I added more fabrics as I worked on the blocks.  We sewed Buzzsaw blocks. Here's a good tutorial.  

Because I like really big bed quilts, I added a 10" border to the quilt.  The quilt measures 113" x 113".  I had to take it to church and hang it over the balcony to take a picture its so big!

Then on to the quilting.  When I originally wrote the pattern/instructions for the Scrappy Swap quilts I made a prototype or practice quilt.  I had this top floating around, so I loaded it on the frame and started playing,  I was fairly satisfied with what I had come up with and took the quilt off the frame to load my big blue.   Then I went to Kamloops and took 4 classes with Claudia Pfeil and came home with completely different ideas.  So, I went ahead and just started quilting.  I stitched a variety of "snowflakes" in each white block and then a meander feather in the border and blue blocks.  While the stitching is not as nice as I had planned or hoped, it's done.


Claudia uses her plastic templates to mark her quilts.  I used my half circles and drew lines along the inside and outside of the curve.


I spent a bit of time planning the insides of the "snowflakes" as well as a different variety of borders. The plan was to work my way across the quilt and in each block stitch a different centre, inner border and echo'd outer border.   

I stitched the centres in a variety of different patterns.


I stitched the ring.


I echoed around the ring design.


I then stitched a variety of motifs on the outside to fill the white blocks.

The borders and blue blocks were stitched with an all over bump back feather design.  I feel fairly competent stitching these feathers now, although they are not my favourite.


I used the Faux Piped Binding to finish the quilt.  I have learned to ALWAYS, ALWAYS, ALWAYS prepare my binding when I'm doing the quilt top.  That way I never have to hunt for binding fabric. 

Friday, April 17, 2015

So many things.......

I've been feeling overwhelmed a bit lately.  Done some travelling...a week in Winnipeg then out to Kamloops for Easter weekend to take classes from Claudia Pfeil.  I also have a number of projects that I want to start/complete as well as Handi Quilter Studio projects.

I have started a new calendar and to do list method.  Its called a bullet journal and so far I think its helping.  I was spending a few minutes surfing pinterest last month and came across this video about using a bullet journal.  I thought it had a some merit...so I'm trying it for a while.  The basic premise is today. Deal with today, what I have to do and if I don't get it done its still there for tomorrow.  I have tried other things over the years, but I was planning weeks and months in advance and by the time I got to those dates, priorities had changed.  I really like the bullets or boxes I get to draw and colour in when the project is done!!!!  Maybe its because I am a list maker and I really like crossing things of my list.

On today's bullet list is
  • Paola's quilt.  I should be able to finish this customer quilt today.
  • Meadow Rose Quilting blog post - half way there!
  • Calgary Thread Girls blog post - up next
  • look for laser square.
  • Supper at home with hubby (probably don't need to include that, but it sure feels good to cross it off the list reminding me that I did do something with him today.
Tomorrow, I get to carry over what didn't get done today or decide it wasn't that important and cross it out. 

I even have a note book for work at the WonderFil Threaducation Centre/Handi Quilter Studio so that I know what projects I need to work on while I am here.

My notebook also has pages for planning ahead.   I still need to figure out a monthly calendar format I like.  The bullet journal one is a 1 page list.


I am visual and kind of like the usual calendar approach, but I do see the value of the list as I can write more on a line.


My journal is not as pretty as some....its practical and messy (that's why I've copied pretty pictures already posted on the internet).  
Cute Notebooking

It seems to work for me.  I do like the idea of being able to move pages, so I have my journal in a customizable system from Staples. 

I do have a couple of highlighted pages (I've wrapped post it notes around the edge of the page!) for specific jobs or events....I have a page for my Church responsibilities.  I have a page for my custom quilting so I know what's coming up next.  I start with the lovely big box and then write the date and some details about the project/job.  I can leave a little space or more after each item.  I even has sub-bullets for the specific tasks in a job.

So far its working....check back in a month or so and I'll keep you updated.

Thursday, March 5, 2015

A week of Quilts - Day 3

I woke up very early this morning with thoughts of what quilts I would share today.  I was going to share applique quilts, then realized that many of my applique quilts are living in other people's homes.  I have put in requests for pictures for tomorrow or Friday.

So, today is Foundation Pieced Quilts.

There was a time when I loved to paper piece.  It was all I did.  I will now make one or two pieced blocks, but the thought of paper piecing a whole quilt does not appeal to me.  What does appeal to me is seeing how small I can make the quilts!

Here is a picture of 4 quilts.  The blocks range in size from 1 1/2" to 3" finished.  I called this pattern Woven Geese.  This pattern works well with gradated hand dyed fabrics.


I stitched this lovely little scene as a time of play....no particular reason.  The border is too big for the block but the piecing is tiny.

This last quilt is a lovely wall hanging my mother made for me.  She LOVES to paper piece!.  You'll have to turn your head to the side to see that it says "welcome".    For the life of me I can't get it to rotate!